Whats the matter with our world? by blaze
Category: Science
My Innovation Day Project
Welcome back to my blog, today i will tell you all about my Project (Drawbridge+Castle). While i was planning for my project, i was also studying about castles and drawbridges. So I want to tell you what i have learned. First, I watched a video about all the different types of castles like, Philippine Castle or battlements, If you wonder why is there a moat, here’s why (a moat is when there is a river around the castle) It was meant to Protect the castle from attack, so is the drawbridge. They used to close it before the troops came in and attack. And when they were under the floor there is a roof with hoes in it and they drop molten lava on them. Alright now that we are finished with what i have learned. Now I want to also tell you about serfs and lords. if you were a girl you would do a job of dancing or musical, And men were swordsmen If you were a privileged child, you would grow up to live in the royal family. Now serfs, serfs are farmers that were controlled by the king, They lived in small simple houses made of wood, they had the least power. Now i want to show you a picture of a feudal system, its just a picture to show who has the most power to least power.

Now to my project. I started off with a plan for my castle and the drawbridge.The drawbridge was meant to be used with gears. so the gears were on the floor and it was connected to another gear, and that gear would spin it. The gear that is spinning had a pulley connected to it, which will pull the string which closes the door. My hypothesis was “it might work because the gear was falling off” my solution was to add clay on the bottom so that it would stick to the ground AND spin.
Lets get back to facts about castles, 1, did you know castle walls are 26 ft thick? 2,did you know they had square walls, so they could dig under and break the castle, so they switched to round walls. and last one. in the earlier castles don’t look like the ones we know,mot and daily castle,But their weakness was fire so they switched to stone walls.
How i made my castle. i started with the drawbridge. my drawbridge has a string in the middle, That string go’s through the wall which is being pulled by the pulley. But i had to use gears so what i did was connect the gear beside the pulley, so when you put a gear beside it, It will spin the pulley. Now the castle, My castle is tall, and the city is in the back. So everything was good. So i painted the cardboard grey(for the castle color) After that was done. i tested out the drawbridge, which suddenly broke! So that has slowed me down. What that is now what i am working on. When it got fixed, I added a wall that you could flip so you can see the inside of the castle. how i did it was, if first made the hinge, which is made from 1 straw and 2 skewers. So the skewers were in the straw and the skewers stayed where it was but the straws moved. so then it could open.now what i have to finish off is the walls and the city. Here is a video of my idea for my drawbridge, with the gears.
Now lets talk about how i built my castle, Here is a video about how i built
Because that video was not my finished product, i will tell you the rest. so this is my procedure. I added the battlements And then i painted the castle grey. When that was done, i added the decorations which were the plant and the table, But i had to add a wall to the front because a castle without a wall is just weird. What i had to do was add the wall to the hinge so it could flip open and close. When i tried the gears it was moving i realized. So what i did was just move the wall closer to make it stay in place. With all That done I had finished my castle.
With all that done, here is my final tour video and picture of all my progress.
Self reflect. The first thing i would do is instead of wasting my time of the ideas for the gears. I could have just done it the easiest way, Which is a gear is connected to a pulley and there is another gear being spun by another gear which pulls the rope and closes the drawbridge. The other thing is when I made the roof for the castle it was falling forward(because there was not a wall in the front) So what i did was flip it over and hot glue it to the walls so it would stay still. After that i should have added the battlement first thing because that took a while. That is all the things i would do if i could go back in time.
Conclusion. I chose to make a gear+pulley system That was on the wall. Which was a problem because it would always fall off. so what i did was put it on the roof and in the procedure (if you read it) it will tell how i made the pulley. So now my pulley+gear is working which is good. Meaning i have finished my castle!
Music
I will tell you how I built my music project.
First, I took and cut in half the Coca-Cola bottle. i taped all of the on top of it, then i took the other half(did-int do anything with it) i just taped it with the other drum. After i took a toilet paper roll and put wax paper on top, i wrap the wax paper around it then put an elastic to stick it with then tape it with the other drum.
Take a red cup put a hole on the top the connect it with the other drum.
then take a transparent plastic cup then put duck tape to make more strong to sound different then after
take another red cup and take a stick and put it with the cup so it’s like a hammer,
Then you will need to do take a transparent plastic cup then add toothpicks inside to sound like a maraka then put tape under then stick a stick through it , hot glue the stick to stick with the cup the you are finished!
How to make a mini parade float
Problem: Can I make a parade float that can hold 100g? Can it go more than 50cm down a ramp?
Hypothesis: I think I can make a parade float that can hold 100g and travel at least 50cm
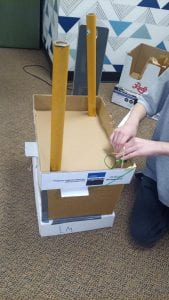
1.Start off with one piece of cardboard about 18cm wide and 27cm in width then take balls with holes in them.
- Take two wooden sticks about 5mm in width and in length is about 30cm
- Take the cardboard and look on the side of it, after look on the side stuff the stick through it
4.Take the balls with the holes stick the stick in one of the holes, after you do that put an elastic right in front of each ball (so the ball doesn’t go out )
5.the take a toilet paper tube about 22cm long, then take a piece of cardboard in width about 19cm and of or how long they are 16 cm
6.Take the toilet paper tube then put it on the piece of cardboard then circle the paper tube then cut out the hole then put the tube in the hole
7.Then hot glue around the tube take a small cup then glue it on top of the tube after it all dries up hot glue the cardboard to the platform
8.Get ANOTHER piece of cardboard in width about 13cm, then in length is about 22cm then hot glue it to the platform and the other cardboard piece
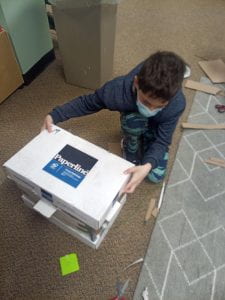
9.Then glue paper outside of the parade float, then draw whatever you want on the paper after you do that take a straw then a bamboo skewer tape the straw to the cardboard
- Take a bamboo skewer and put it in the straw, after take a piece of paper and draw any flag you want on when your done drawing tape it to the straw and bamboo skewer
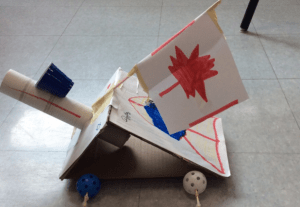
- Take any marker and start drawing on it when you’re done it will end up like this.
- Test the float.
RESULTS: I made it go 190 cm and it could hold 200g.
This is the tank parade float that you made!!!;)